Do you want to start your own blog and make money online? This easy step-by-step guide will show you exactly how to start a blog in Canada.
Plus, you’ll get a free domain name when you start your blog today. Follow this guide to get your site up and running in minutes.
When I started my blog a few years ago, I was looking for ways on how to make money in Canada as a student. I didn’t know anything about WordPress or tech stuff. I learned everything from scratch.
That’s the best part about blogging – you don’t need to be a computer genius or IT wizard to start a blog. It’s easy to set up a blog in Canada and anyone can do it!
If you’re wondering if it’s possible to start a blog in Canada that makes money, the answer is yes! I live in Canada and will show you exactly how I started my money-making blog.
Are you ready to get started? Follow these steps to launch your blog and learn how to make money online in Canada!
Related Posts:
- How to become a blogger and make money
- 10 rookie mistakes to avoid when starting a blog
- Best affiliate marketing programs for beginners

Please note I started my blog with Bluehost and recommend them. If you make a purchase through one of my links (at no additional cost to you), I will receive a commission, which helps keep this website up and running. I would never advocate for buying something that you can’t afford or that you’re not yet ready to implement. If you have any questions about starting a blog, please email me at [email protected].
Table of Contents
Why you should start a blog in Canada
There are many reasons why you might be interested in starting your own blog. Here’s a few reasons why you’ll love blogging:
✓ You can inspire or help others through your blog.
✓ Because most companies pay in USD dollars, your Canadian bank account will be happy.
✓ You can share your personal story.
✓ You can use blogging as a creative outlet.
✓ You can target traffic to your blog from Canada, the USA and the rest of the world.
✓ You can start a work-from-home business
✓ You can connect with brands and people that you admire.
✓ It’s affordable to start a blog in Canada and requires no prior tech-knowledge.
✓ You’ll gain confidence, build a community, and feel good about your work.
If your goal is to achieve any of the things above, then blogging can help you get there. By getting started today, you can create these life-changing opportunities for yourself too!
Blogging has allowed me to work from home, have a flexible schedule, travel anytime I want, and more. Just a few years ago, I was unhappy at a dead-end job and now I’m my own boss! It’s feels amazing to create such a positive community through my blog.
Should I start a free blog or a paid blog?
Many people think that starting a free blog on WordPress or Blogger is a good idea in the beginning. But starting a free blog is a bad idea, especially if you have ANY desire to make money from your site.
If you just want to blog has a hobby and have NO desire to make money from your blog, then you should probably start a free blog.
If you want to blog as a hobby and eventually want to make money from your blog, then you should start a paid blog.
This is what I did. I started my blog as a hobby and paid for web hosting in the beginning. I’m so glad I did because this allowed me to start earning a full-time income from blogging.
If you want to start a blog so you can make extra money from home, then starting a paid blog is a must.
If you want to start an online business and make money from your blog, then starting a paid blog is a must.
I’m going to assume that because you are visiting this website, you are probably interested in making money from your blog. Maybe you just want to make some extra money for fun or maybe you want to earn a full-time income from blogging someday?
Either way, it’s nice to get compensated for all the hard work you put into your blog. There’s nothing wrong with wanting to make money from your blog.
If you have any desire to make money from your blog, then yes, paying for your web hosting (such as through Bluehost) is a MUST. It’s very affordable and easy to get started. And you can run your own advertisements, affiliate links or product sales with a blog using Bluehost.
It’s difficult to make money from free blog sites in Canada. That’s because free blogs have restrictions in place. If you have a free blog, you don’t own your content, which means your free website could shut down overnight for no reason.
Plus, many advertisers don’t view free blogs as professional, compared to self-hosted blogs. This is why I always recommend Bluehost to anyone who wants to start their own blog. I have researched and used other hosting sites before, but I found Bluehost to be the best blogging platform in Canada.
Reasons why you should use Bluehost
I started my blog with Bluehost and recommend them as the best web hosting choice for new bloggers. There are many web hosting companies to choose from, but Bluehost is one of the best. It’s one of the top web hosting companies of 2021. It’s also super easy and affordable to start your own blog with them.
✓ It’s easy to use – anyone can create a self-hosted WordPress blog with this tutorial
✓ You get a FREE domain name
✓ #1 recommended web hosting company by WordPress.org
✓ Bluehost offers 24/7 supportvia live chat, email, or phone
✓ FREE WordPress.org installation
✓ Bluehost is the best affordable paid hosting for beginners.You can start your own blog for as low as $3.92 CAD per month. This is an exclusive price for Mint Notion readers.
✓ You will own your blog and be self-hosted. If you ever want to monetize your blog, you must be self-hosted.
✓ Bluehost offers a 30 day money-back guarantee. If you have any questions throughout this process, just send me an email and I’m happy to help you out.
PRO TIP: Hosting is the #1 factor in website uptime and Bluehost is the #1 recommended host by WordPress. Uptime is an excellent measure of how good a hosting provider is at keeping their system up and running. Bluehost has a 99.99% uptime guarantee.
Why is uptime important? – If you’re website is down, users can’t access it. This is why uptime should be one of your top priorities when choosing a web host.
Over 2 million websites are already powered by Bluehost and it’s a favorite among many new bloggers because it’s user-friendly. With just the click of a button, you can easily install WordPress and get your site up and running within minutes.
As you can see, there are many benefits of using Bluehost to start your blog. Thanks to their 30-day money-back guarantee, there’s very little risk of starting a blog through Bluehost, and a lot of potential to make money blogging.
How to start a blog in Canada that makes money
Below are the simple steps on how to start a blog for beginners.
1. Start your blog the right way (choose your web hosting package)
2. Choose a domain name for your blog
3. Select a WordPress theme (make your website look pretty)
4. Install plugins
5. Add essential pages to your blog
6. Write your first blog post
7. Promote your blog
8. Start making money from your blog
Step 1: Choose Your Web Hosting Package
Choosing a web hosting package is important if you want to have a successful blog. This tutorial is going to show you how to start a blog with Bluehost. You can use any web hosting company you wish, but I personally recommend Bluehost because that’s how I started this blog.
You can click the Get Started button at Bluehost to get started.
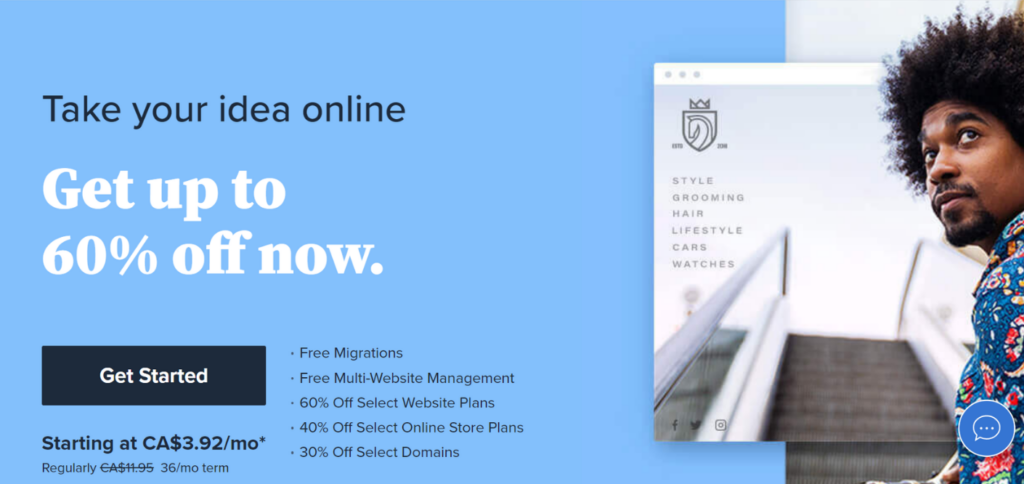
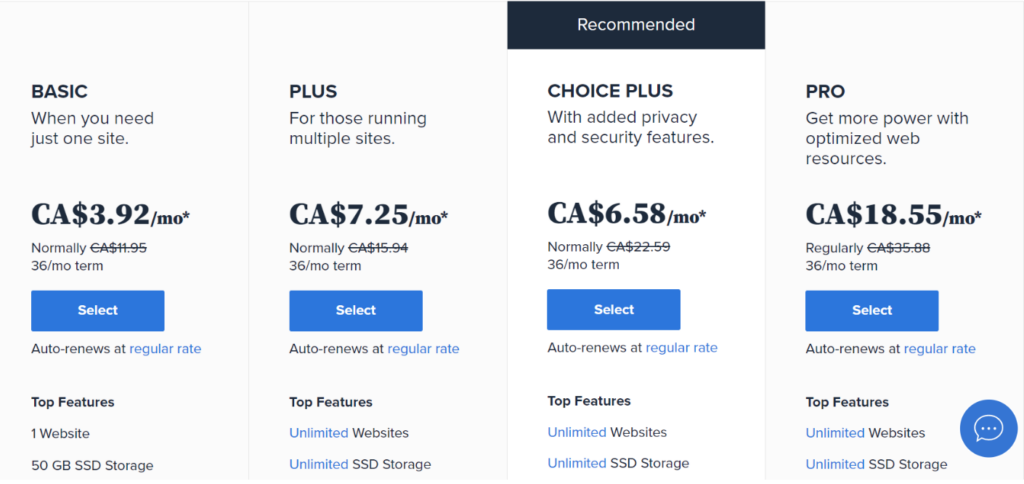
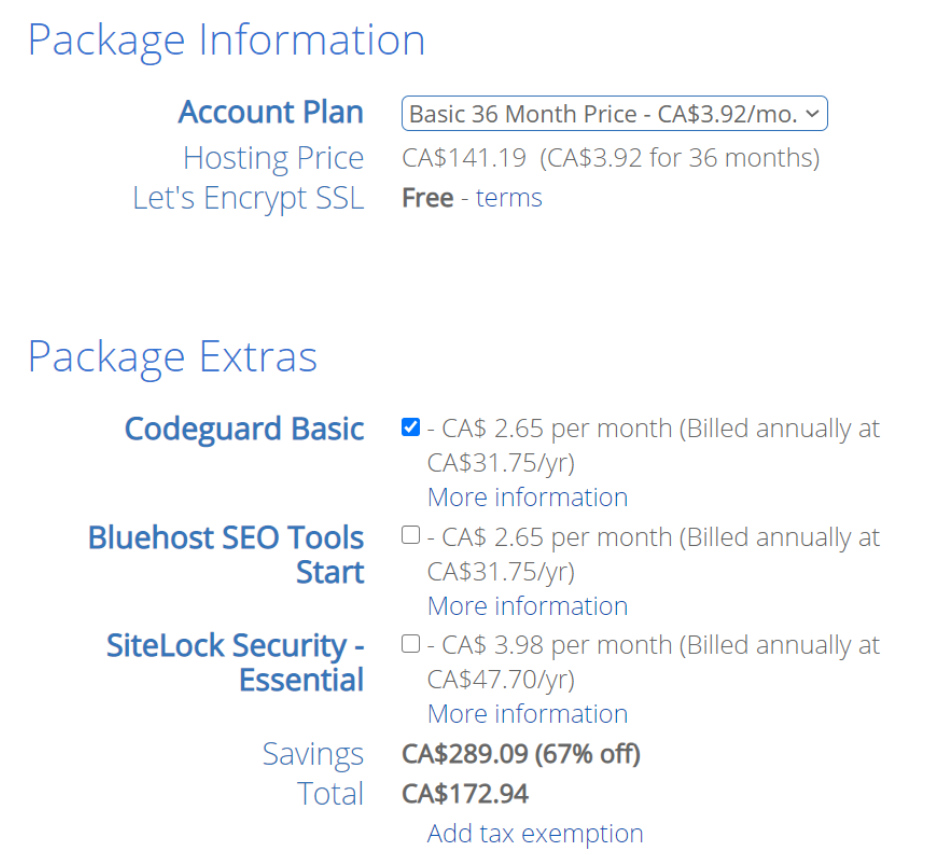
I recommend choosing the Basic starter package as that’s really all you need. It’s a great deal at 50% off the regular price!
How much does it cost to start a blog?
To get the best value, I recommend purchasing a 36-month plan (paid upfront in full). This is what I did when I started my blog. It’s the cheapest option and great for beginners. This will cost as little as $3.92 Canadian dollars per month.
Step 2: Choose your domain name
A domain name is your website name. This is the URL address where readers can find your website. For example, my domain name is www.mintnotion.com.
If you are starting a Canadian business or want to start your blog for primarily a Canadian audience, then you may want to consider choosing a .ca domain name.
If you are starting a blog that targets readers in Canada, the USA and the rest of the world, then you’ll want to choose a .com domain name.
PRO TIP: Google the domain name you’re interested in using. This can help you see what other websites pop up. You want to make sure that your domain name is available. If you want to use social media, you want to make sure the handle or usernames are available too.
The price of a domain name is around $15-$25 per year, but when you sign up through this tutorial, you’ll get a FREE domain name with Bluehost.
To register your free domain name with Bluehost, follow the instructions below which will let you to purchase your hosting and get the domain name all in one step.
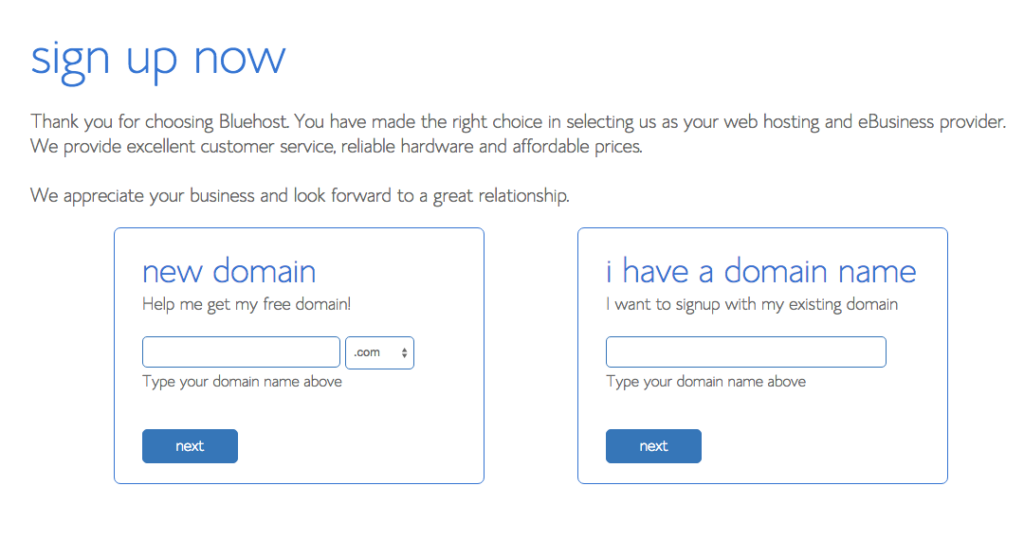
Once you’ve chosen your free domain name, the next step is simply to fill out your contact details and payment information.
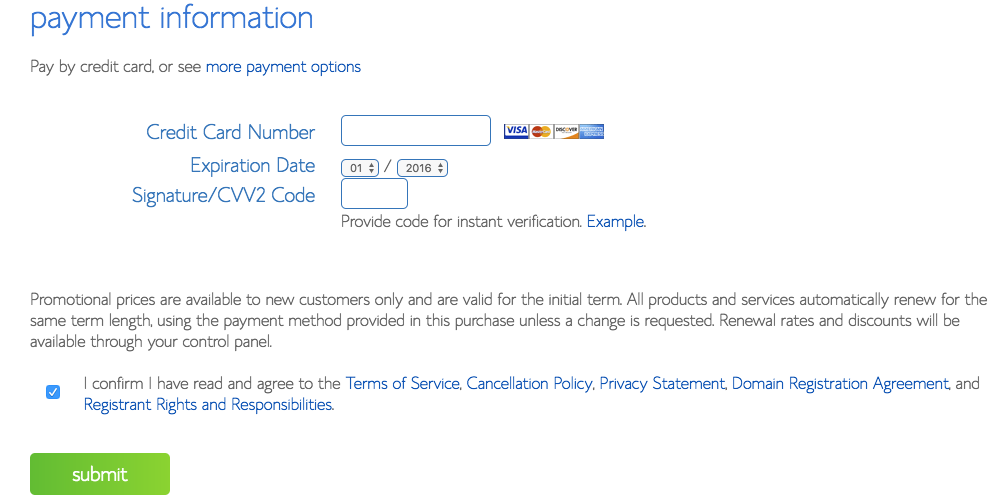
You can uncheck any of the extra add-ons, as this will only increase the cost of starting your blog. I recommend choosing Codeguard Basic, which is only $2.65/month. This makes daily backups of your website.
Step 3: Install WordPress & Select a Theme
After you’ve purchased your hosting package and registered your domain name, the next step is to install WordPress. WordPress is the publishing platform that will let you easily create blog posts and customize your website.
1. After you’ve created a password for your account, Bluehost will show you what you need to do in order to set up your blog.
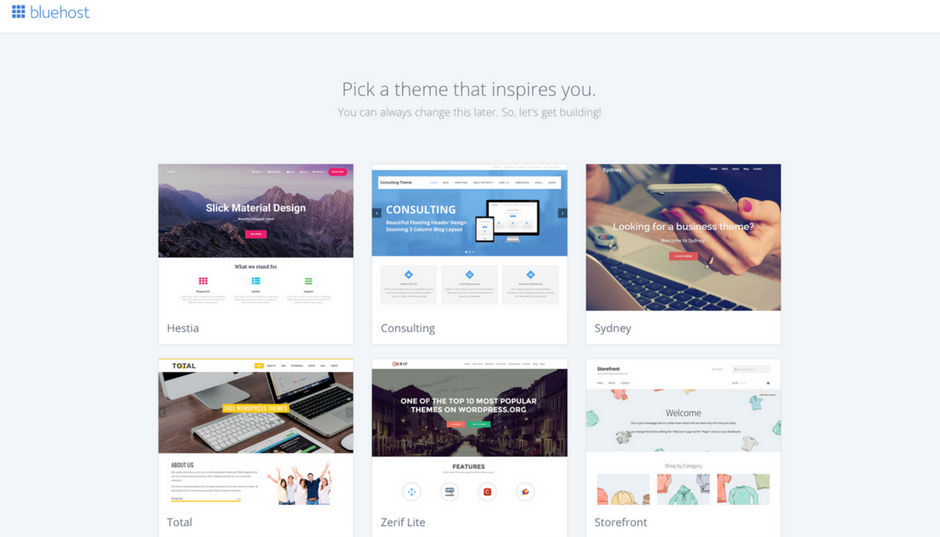
2. Bluehost will ask you to pick a theme. You can choose any theme here, just pick one that inspires you.
You can always change your theme later, so it’s not a big deal. There are lots of free options too, so if you prefer to skip this step, just scroll to the bottom of the page and click “skip this step”.
3. After you select a theme, click on “Start Building”.
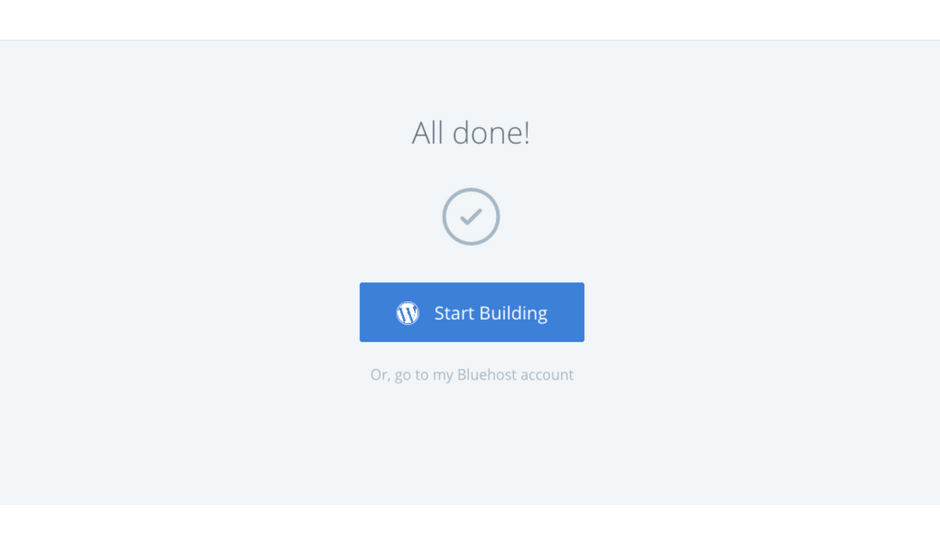
4. The next screen will ask what kind of site you would like to set up: “Business” or “Personal” — it’s really up to you. Or you can click on “I don’t need help”.
Step 4: Install Plugins
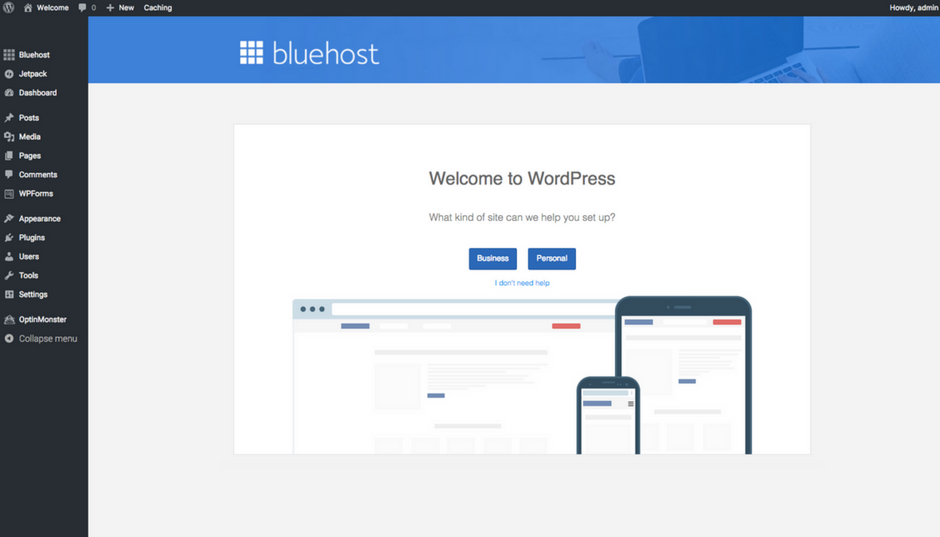
YAY! Congratulations on setting up your blog!
Now you can log into your WordPress dashboard and start blogging — this is the part I know you’ve been waiting for! The URL for your dashboard should be: yourblogname.com/wp-admin/
If you want to upload a different WordPress theme, you can click “Appearance” from the left-hand side of your WordPress dashboard, then select “Themes”.
My favorite free WordPress theme is Olsen Light.
My favorite paid themes are from Restored 316 Designs.
After you’ve selected a pretty theme, it’s time to install plugins. A WordPress plugin is like an app that allows you to add helpful features to your blog.
Most themes will come with a list of recommended plugins, which you can follow if you’d like.
PRO TIP: Before installing any plugin on your website, always make sure to Google it and check the reviews. Sometimes plugins have not been updated in a long time or could slow down your website, which is something you don’t want.
Here are some plugins that I use and recommend for new bloggers:
Yoast SEO – This can help your blog posts rank better in search engines like Google.
Simple Social Icons – This gives you social media follow buttons, like the ones at the top of my website.
WordFence Security – This provides firewall and protection for your website from hacking, malware and viruses.
To add a new plugin to your website, go to the Plugin tab and click “add new”. Search for the plugin you want to add, install it, then click “activate” as prompted.
Step 5: Add the important pages to your blog
Now that you’ve started your blog, you’re probably wondering what are the most important pages that you must have on your website?
WordPress comes with two default types of content called posts and pages. Posts are for writing articles and blog posts. Pages are static and it keeps this type of content separate from your regular blog posts.
Here are some pages that every successful blog needs:
1. About Page
Your About Page is a good way to let your readers know more about your blog. Here you can share the purpose of your website, its mission and values, and what your readers can expect to find on your blog. You can also use your About Page to highlight some of your most popular content or give your readers a call-to-action, such as to sign up for your newsletter.
2. Contact Page
It’s important for your readers or other businesses that potentially want to work with you to find your contact information. A contact page allows users to easily send you a message or learn how to get in touch with you, via email or phone. You can also share your social media profiles here to offer more ways to contact you.
3. Privacy Policy Page
A Privacy Policy page is important because it lets users know about the data you collect on your website and how third-parties may use this information. Even if you are not personally collecting data, such as through an email list, third-party tools on your blog like Google Analytics can still set cookies.
If you are using Google Adsense or working with an advertising company such as Mediavine or AdThrive, then you are required to add a Privacy Policy page to your blog. You can find privacy policy page templates online to help you create your own.
3. Disclaimer Page
If you make money from your blog, then you need to add a Disclaimer Page. This lets users know exactly how you make money from your blog, such as using display advertising or promoting affiliate products. You can take a look at disclaimer page templates online to help you create your own. Sometimes affiliate or advertising companies will let you know what to write on your disclaimer page.
Step 6: Write your first blog post
This is the most exciting part – to start writing blog posts!
To add a new post to your blog, go to Posts and click “add new” to write a new post.
I like to write my blog posts in a Word document, then I add it to my blog to edit the content. I launched my blog with just three blog posts, but you may want to wait until you have at least 10 blog posts up. This will give your readers enough content to read so they can get to know your website. Honestly, there’s no rules about how many blog posts you should have, just do what feels right for you.
When writing blog posts, it’s a good idea to add at least one image to your post. This can help break up your content and make it more interesting. You can take your own photos or find free stock photos online on sites such as Canva, Unsplash or Pexels.
You’ll also want to use headings in your blog posts to make your content easier to read. Using Heading Tags can also help your blog posts rank higher in search engines.
H1 – This is usually used for your blog post title. Normally only one H1 tag is used for a page.
H2 and H3 – H2 will be the main headings within your blog post and H3 will be used for subheadings.
Step 7: Promote, promote, promote!
When I first started my blog, I thought that if I wrote blog posts and made my website look pretty, people would magically find me.
Unfortunately, it doesn’t work like that for new blogs. Maybe it works for celebrities or people who already have a huge following. But for me and most new bloggers, I had to promote my blog on social media in order to build an audience.
A good rule to follow is the 80/20 rule. This means 20% of the time, you’ll be creating awesome blog posts and 80% of the time, you’ll be promoting your awesome blog posts.
There are many places to promote your blog for free, such as Pinterest, Instagram or Facebook. Pinterest is the quickest way to drive traffic to your website.
I also recommend learning SEO, which is search engine optimization. This can help your blog posts rank higher in search engines such as Google.
Step 8: Make money from your blog
There are many ways to make money from your blog. Whether you want to learn how to make an extra $1,000 a month blogging or make $10,000+ a month, it’s up to you! Here are the four most popular ways to make money blogging:
1. Display Advertising
Most people start making money from their website through display advertising. This is when you put ads on your website.
How much do bloggers make in Canada?
With display ads, you can earn an average of $10 per 1,000 page views. This means if your blog receives 25,000 monthly page views, you can expect to earn $250. If your blog receives 100,000 monthly page views, you can earn an average of $1,000 a month in Canada.
As you can see, display advertising doesn’t pay much. How much money you earn depends on how many page views your site gets. There are better ways to make money from your blog, which I’ll share below.
Most ad companies require a minimum amount of monthly page views before you can apply. You can use Google Analytics to track your monthly page views and sessions. Here are the top 3 ad companies you can choose to work with:
- Monumetric – Requires a minimum of 10,000 monthly page views.
- Mediavine – Requires a minimum of 25,000 monthly sessions.
- AdThrive – Requires a minimum of 100,000 monthly page views.
2. Affiliate Marketing
This is the process of earning a commission by promoting other people’s products. Affiliate marketing is one of the best ways for beginner bloggers to make money.
For example, you find a product (or service) you love. Search for the product on Google to see if they have an affiliate program. Then you share this product with your audience and earn a piece of the profit from each sale you make.
Below are more tips on how to find the best affiliate programs for bloggers:
Read Next: The best affiliate marketing programs for beginners
How much do bloggers make? Some blogs earn $0 from affiliate marketing. Some blogs earn $100,000+ per month from affiliate marketing. As you can see, affiliate marketing gives you the potential to earn a lot of money. You also don’t need a lot of page views to make money with affiliate marketing.
To get started, take an online training course that will teach you how to maximize your affiliate income. Michelle earns over a million dollars per year from her blog. The majority of the income she earns comes from affiliate marketing. Her self-paced course helped me grow my blog from $0 to $10K+ per month.

3. Sponsored Posts
Sometimes companies will reach out to you through email and ask if you’re interested in doing a sponsored post for their product or service. You can also reach out to companies directly to see if they will sponsor a post on your blog.
For new bloggers, I recommend finding opportunities through media networks. Here are some popular ones you can join:
NOTE: Whenever you publish a sponsored post or use affiliate links, you must provide a disclosure within your post to let your readers know. This is the law. For example, you can put it at the beginning of your post and say “This post may contain affiliate links” or “This post was sponsored by Company XYZ”.
4. Sell your own products or services
This can be an excellent way to make money from your blog. Here are some ideas for products you can start selling through your blog:
- E-books
- E-courses
- Physical products
- Your photography
- Printables (I use Shopify to sell my digital products)
If you prefer to sell services, here are a few ideas to get you brainstorming:
- Coaching
- Freelance writing (this is a great online training course to help you make money freelance writing)
- Virtual assistant (check out this list of 150+ virtual assistant services you can offer)
- Pinterest services – How to make money on Pinterest
- Web design
- Travel planning